Creating a new sub-site in Tridion
We will need to assist you with some of the steps below, but you can begin the process below. Please follow sections 1 & 2, and then submit a MNIT Service Hub ticket to us when you get to section 3.
Process for creating a sub-site
-
- Navigate to: 050 [Your Publication] Website > root
- Create a structure group for your new sub-site, and complete the following fields:
- Name: Name the structure group something that represents your site, like "MMB Intranet." Add numbers at the beginning if needed, to discern from other structure groups in your main site (like "500 MMB Intranet" or "999 MMB Intranet").
- Directory: when naming your folder, make the name all one word (like "mmbintranet") or use hyphens to separate the words (like "mmb-intranet"). No spaces or special-characters are allowed.
- Display in Navigation: uncheck both Live and Staging.
- Save and Close the new structure group.
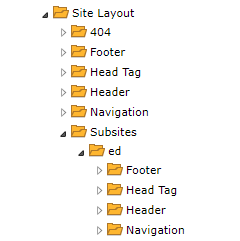
To begin, you'll need to create a folder for your subsite where the Header, Footer, Navigation, and Head Tag will reside.
- Navigate to: 020 [Your Publication] Content > Building Blocks > Website Content > Site Layout > Subsites
- optional: If you do not have a Subsites folder in the Site Layout folder, go ahead and create that at this time.
- Create a folder for your subsite. IMPORTANT: use the same name you used for the structure group directory in step 1.2.b.
- Double-click on the folder you created.
Inside of it, create the following four folders. Please name them exactly as shown below, using the same upper and lowercase format:
- Folder 1:
- Name: Footer
- Schema: Footer
- Folder 2:
- Name: Header
- Schema: Header
- Folder 3:
- Name: Head Tag
- Schema: Head Tag
- Folder 4:
- Name: Navigation
- Schema: Subsite Navigation
- Folder 1:
- In the Footer folder, create a new component:
- Name: Footer (capitalize the first letter!)
- Schema: Footer
- In the Head Tag folder, create a new component:
- Name: Head Tag (capitalize the first letter!)
- Schema: Head Tag
- In the Header folder, create a new component:
- Name: Header (capitalize the first letter!)
- Schema: Header
- Site name: Enter a name for your site, with any acronyms defined in full (like "Department of Human Services (DHS)"). What you enter here will display in the header of your site, if a picture logo is missing or omitted.
- Relative URL: enter the root directory URL for your subsite. The URL begins with the root folder for your entire website (like "/mmb" or "/dhs") and is followed by the structure group directory name you created in step 1.2.b (like "/mmb-intranet"). The full URL will look something like: /mmb/mmb-intranet/. The full URL must end with a forward slash (aka a trailing slash).
- In the Navigation folder, create a new component:
- Name: Navigation (capitalize the first letter!)
- Schema: Subsite Navigation
- Subsite Root Directory: enter the root directory URL for your subsite. The URL begins with the root folder for your entire website (like "/mmb" or "/dhs") and is followed by the structure group directory name you created in step 1.2.b (like "/mmb-intranet"). The full URL will look something like: /mmb/mmb-intranet. The full URL must begin with a forward slash, but not end with one.
Please submit a MNIT Mall Website Service Request ticket when you get to this section and include the name/location of the structure group created in Step 1. The MNIT Enterprise Web Team will take care of the remaining steps.
Every site has a site template - a file that instructions the system which components to use for the site's header, footer, head tag, site name, and navigation (top and left menus).
- To get started, navigate to: 020 [Your Publication] Content > Categories and Keywords > Site Templates
- Find the Subsites keyword.
- (optional) If one doesn't exist, create it at this time using the Value: Subsites and Type: Abstract Keyword.
- Right-click on the Default keyword and select Copy.
- Right-click on the Subsites keyword and select Paste. Under the Subsites keyword, a Copy of Default keyword will appear.
- Right click on Copy of Default and select Properties. Make sure the following fields match these instructions exactly:
- Value: remove Copy of Default and enter the same name you used for the structure group directory in step 1.2.b.
- Metadata Schema: confirm that this is set to "Site Template Keyword Metadata."
- Site Name: enter a phrase that describes your site, such as "Department of Employment and Economic Development (DEED)." This will appear with the page title on every page on your website and is important for search engine optimization. Please define in full any acronyms used in this field. (For example: use "Minnesota Management and Budget (MMB) Extranet" instead of "MMB Extranet.")
- Head Tag Component:
/Building%20Blocks/Website%20Content/Site%20Layout/Subsites/yoursitename/Head%20Tag/Head-Tag.xml- Replace yoursitename with the name you used for the structure group directory in step 1.2.b
- Head Tag Template:
/Building%20Blocks/System/Templates/Content%20templates/site%20layout/head%20tag/Site%20Head%20Tag.tctcmp - Header Component:
/Building%20Blocks/Website%20Content/Site%20Layout/Subsites/yoursitename/Header/Header.xml- Replace yoursitename with the name you used for the structure group directory in step 1.2.b
- Header Template:
/Building%20Blocks/System/Templates/Content%20templates/site%20layout/header/Header.tctcmp - Navigation Component:
/Building%20Blocks/Website%20Content/Site%20Layout/Subsites/yoursitename/Navigation/Navigation.xml- Replace yoursitename with the name you used for the structure group directory in step 1.2.b.
- After /Building%20Blocks/, remove System/Templates/Content%20templates and replace it with Website%20Content
- Make sure Site Layout and the first Navigation are capitalized!
- Navigation Template:
/Building%20Blocks/System/Templates/Content%20templates/site%20layout/navigation/Subsite%20Navigation.tctcmp- Make sure to add Subsite%20 in front of the second Navigation!
- Left Navigation Component:
/Building%20Blocks/System/Templates/Content%20templates/site%20layout/navigation/Navigation.xml - Left Navigation Template:
/Building%20Blocks/System/Templates/Content%20templates/site%20layout/navigation/Left%20Navigation.tctcmp - Footer Component:
/Building%20Blocks/Website%20Content/Site%20Layout/Subsites/yoursitename/Footer/Footer.xml- Replace yoursitename with the name you used for the structure group directory in step 1.2.b
- Footer Template:
/Building%20Blocks/System/Templates/Content%20templates/site%20layout/footer/Footer.tctcmp
- Value: remove Copy of Default and enter the same name you used for the structure group directory in step 1.2.b.
For your new sub-site, you'll need to make two LESS files - one for the Custom file and one for the Variables file.
- Download these two files: Custom file and Variables file.
- Navigate to 020 [Your Publication] Content > Building Blocks > System > Templates > Assets > LESS Files
- Create a new component:
- Name: custom-yoursitename (Replace yoursitename with the name you used for the structure group directory in step 1.2.b.)
- Click the Load from Disk button
- In the pop-up window, browse to the file you saved in step 1. Select it and upload it.
- Save and Close the component.
- Name: custom-yoursitename (Replace yoursitename with the name you used for the structure group directory in step 1.2.b.)
- Back in the LESS folder, create a new component:
- Name: variables-yoursitename
(Replace yoursitename with the name you used for the structure group directory in step 1.2.b.) - Click the Load from Disk button
- In the pop-up window, browse to the file you saved in step 1. Select it and upload it.
- Save and Close the component.
- Name: variables-yoursitename
- Navigate to the folder where the LESS files are stored:
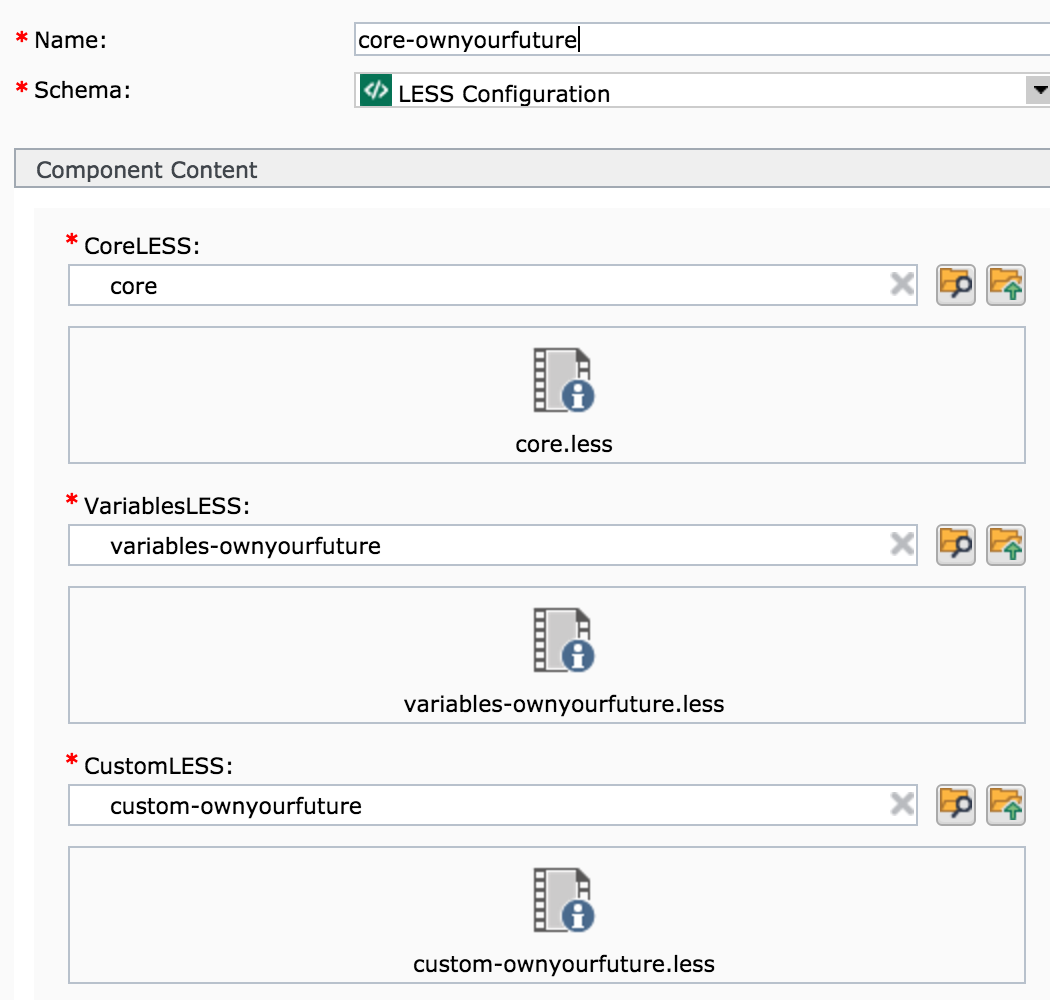
020 [Your Publication] Content > Building Blocks > System > Templates > Assets > LESS files - Create a new LESS Configuration component:
- Name: core-yoursitename
(Replace yoursitename with the name you used for the structure group director in step 1.2.b.) - Schema: LESS Configuration
- CoreLESS: click the Browse icon at the end of the row and insert the following file:
020 [Your Publication] Content > Building Blocks > System > Templates > Assets > LESS files > core - VariablesLESS: insert the file you created in step 4.4:
020 [Your Publication] Content > Building Blocks > System > Templates > Assets > LESS files > variables-yoursitename - CustomLESS: insert the file you created in step 4.3:
020 [Your Publication] Content > Building Blocks > System > Templates > Assets > LESS files > custom-yoursitename
- Name: core-yoursitename
- Save and Close the component.
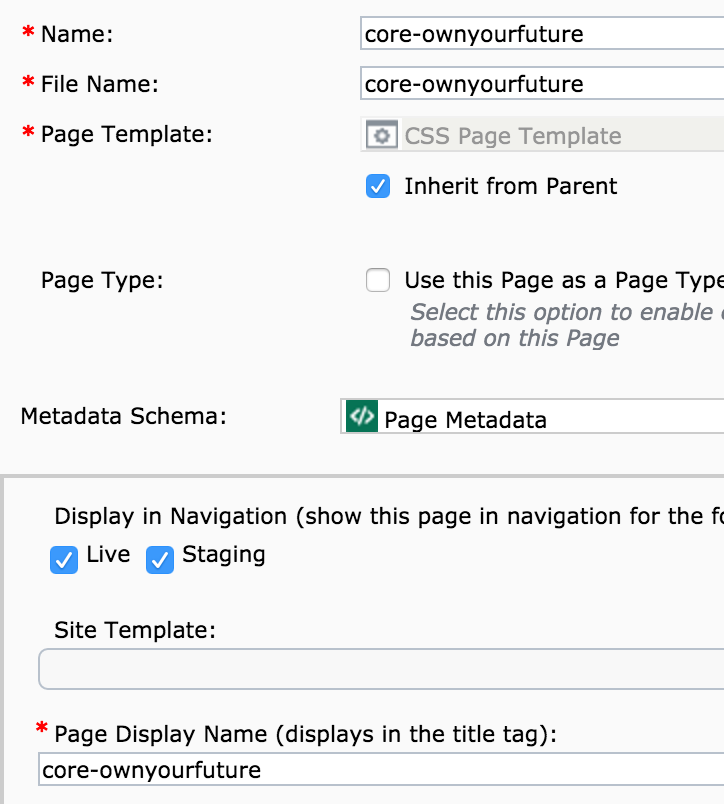
Your sub-site requires its own CSS page within the CSS structure group for your site.
- Navigate to 050 [Your Publication] Website > root > css
- Create a new page:
- Name: core-yoursitename
(Replace yoursitename with the name you used for the structure group directory in step 1.2.b) - File Name: core-yoursitename
(Replace yoursitename with the name you used for the structure group directory in step 1.2.b) - Page Display Name: core-yoursitename
(Replace yoursitename with the name you used for the structure group directory in step 1.2.b) - Click the Component Presentations tab:
- Insert the LESS configuration file you created in section 5.
- Save and Close the page
- Name: core-yoursitename
- Navigate to the structure group you created in section 1. The location will be something like:
050 [Your Publication] Website > root > yoursitename - Right-click on the structure group and select Properties from the menu
- In the Site Template field, choose the name of your site template (created in step 3.4.a)
- Save and Close your structure group
- Navigate to the structure group created in step 1.
- Create a new page and enter this into the following fields:
- Name: Index placeholder
- File Name: index
- Page Display Name: Index placeholder
- Name: Index placeholder
Publish the following items:
- The footer, header, head tag, and navigation components you created in section 2.
- The CSS file created in section 6
- The structure group created in section 1 (uncheck "Republish only" when publishing)
Troubleshooting
Sub-sites are notoriously tricky to create and a lot of things can go wrong. Below are some common problems encountered during the creation process, and how you can fix them.
-
If the structure group or page fails when you publish it, the most likely reason is because the URLs in the Site Template Keyword are incorrect. The URLs are case-sensitive and also must contain the correct path for all components. Here are some things to inspect:
- Check to make sure all the components for the sub-site have been created, as described in step 2
- Check your folder paths against each URL in the site template to make sure the components are located in the correct place (footer, header, etc.)
- Check that the URLs have the correct capitalization for each folder and component
- Make sure all spaces in folder and component names have been converted into %20 (which is HTML code for a space)
- Check your URLs carefully for typos. Are you missing a hyphen? Have an extra slash somewhere?
Once you've fixed any issues or typos, try publishing your structure group again (and don't forget to uncheck the "Republish only" box!).
If it continues to fail, and you cannot find any incorrect paths or typos anywhere, check to see if your subsite name has a number (or numbers) in it. There are certain fields that fail when numbers are used. To resolve this, see the instructions under "The CSS fails to publish" for replacing the numbers in the building blocks for your sub-site.
If it still continues to fail, check your Site Head Tag template building block. It needs to be connected to a component template, AND the name of the component template MUST match the name of the template building block.
If this happens, you'll see your content displayed on a white background, but it will have no styling applied (everything will be left justified and images may be huge). If you go to the CSS file directly in your browser, you may see a message that says "Images Not FoundImages Not Found."
This happens when the subsite cannot locate the CSS file. To resolve this, make sure you have set up the LESS files as instructed above.
Once you have confirmed that the LESS files were established properly, the next thing to rule out is having numbers in your subsite name. If your subsite name contains a number, the system cannot handle this. You will need to go back and change all numbers to words (like "20" to "twenty") in the following places:
- The site template's Value field
- The core-yoursubsite LESS configuration file's Name field
- The custom-yoursubsite.LESS file's Name field
- The variables-yoursubsite.LESS file's Name field
- The core-yoursubsite.CSS file's Name and File Name fields
Once you've updated these, republish the core-yoursubsite.css file. Then open your subsite's structure group properties and check to make sure the site template is now showing the revised keyword in the Site Template field. Finally, republish your structure group (unchecking the "Republish Only" box). Your CSS should publish after making these changes.
This happens when the respective URL path for the component is wrong in the site template. We just need to track down the right component, update the site template with the correct URL, and republish the structure group.
A note about updating your site template in the future
Once you've successfully published everything, and built out your site, if you ever need to make changes to your site template you will also need to republish the structure group you created in step 1. Doing so will republish everything on your site, so be cautious of this before publishing. Consider publishing at the end of the day (when the queue is less full) and also make sure there isn't any content that will accidentally be pushed live before you're ready.
- Navigate to: 050 [Your Publication] Website > root