Create a Quiz
This page contains information on how to create Quizzes.
-
Create a Quiz component
The first step to creating a Quiz is to create the Quiz component that produces it.
Name: enter a name for your component here.
- Schema: select Quiz
- The title of your quiz: enter a title for your quiz here.
- The instructions for your quiz: enter one or two paragraphs describing the quiz and any instructions the user may need. This is a rich-text field that accepts links, bullets, and some formatting.
- End headline: enter a headline that users will be greeted with when they complete the quiz.
- End content: enter any additional content that you'd like to display to users upon completing the quiz. This is a rich-text field that accepts links, bullets, and some formatting.
- Question/Answer set: you'll need to complete a question/answer set for each question that you plan to ask in your quiz. To create a new question/answer set, click the green plus sign
that is furthest to the left.
- Question: enter the quiz question here.
- Answer option: enter the answers that the user can select from, when answering the question. The field for your first answer is provided, but you will need to click the green plus sign
to add fields for additional answers. You can add up to 9 answers.
- Select the answer number corresponding to the correct answer: from the drop-down, choose the number of the correct answer.
- Optional supplemental solution text that will be displayed under the correct answer: enter up to one paragraph of optional text that you would like to display when the user selects the correct answer.
- How many questions do you want displayed?:
- 0: if you enter zero (0), the quiz will display all of the questions you've entered.
- 1 - MaxNum: this stands for "1 through maximum number of questions." The number you enter in this field will set the number of randomly selected questions that will display on the quiz. For example, if you have a quiz with 5 questions, and put 3 in this field, the quiz will only display 3 questions. It will randomly select from the 5 question options which 3 questions to display.
- Do you want the user to fail the quiz on their first incorrect answer?: select "True" or "False" from the drop-down. False means the user will continue even if they answer incorrectly. True means the quiz will come to a halt.
- Do you want the user to fail the question on an incorrect answer?: select "True" or "False" from the drop-down. False means the user will have the opportunity to answer again until they find the correct answer. True means the user will not be allowed to answer again and the quiz will move on.
- Do you want to display "correct" or "incorrect" next to the answers that are chosen?: select "True" or "False" from the drop-down. True means the quiz will display correct/incorrect next to selected answers, False means they user gets no feedback on whether they've chosen correctly or not.
- Do you wish to display the optional solution text under each answer?: select "True" or "False" from the drop-down menu. True means they will see the optional text you entered for each answer (see item 7 above), False means they'll receive no additional feedback.
- What ordered list type do you want the answers to display as? (1 = numeric, A = capitalized letters, a = lowercase letters, 1 = uppercase Roman numerals, i = lowercase Roman numerals): from the drop-down, select the way you'd like your quiz answers to display, using the guide provided.
- Would you like the score progress indicator to appear beneath the quiz questions?: select "True" or "False" from the drop-down. True will add a progress indicator bar to the quiz, which shows the user how well they are doing. False omits the bar.
- Start button text: enter the text that should display in the button the user clicks to kick off the quiz.
- Restart button text: enter the text that should display in the button the user clicks to retake the quiz.
- Would you like to grade on a pass/fail?: Leave this blank if you don't wish to grade on a pass/fail. Otherwise, enter the decimal equivalent to the percentage point at which the user would fail the quiz.
When you have filled out the fields as needed, save and close your component.
Create Additional Components (optional)
Quizzes are just one part of a page, so you will need to create additional components to fill in the other space on the page. Other components you could include (but aren't limited to) are: body text, images, etc.
Please create those components at this time.
Create the Page
- In the 050 section, navigate to (or create) the structure group where the page will reside.
- Create a new page.
- Fill in the Name, File Name, Page Display Name, Dublin Core Title, and Dublin Core Description fields.
- For the Page Template field, select Flex Layout - Internal Page.
- Click the Design tab.
- Click the Add button:
- Navigate to the Quiz component you created in step 1, select it, apply the Quiz component template, and insert it into the page.
- Navigate to any additional components you created in step 2, and insert them with the appropriate component templates in the appropriate order.
- Close the Insert Component Presentation pop-up window.
- Save and Close your page.
Publish the Page
When you've completed all the steps above, then all you need to do next is publish your page.
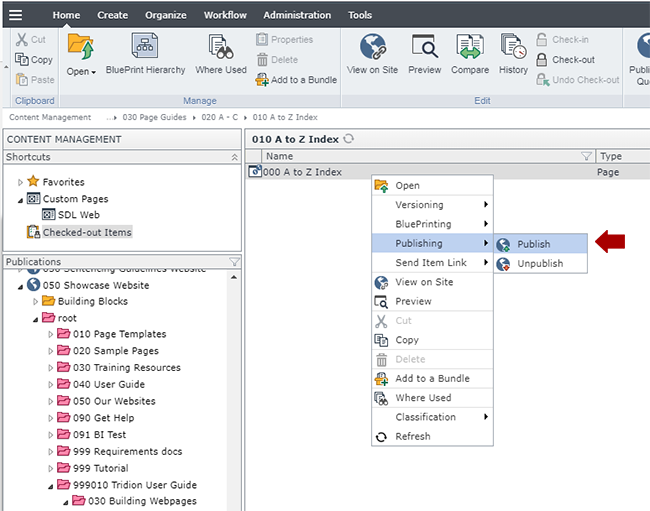
In the 050 section, navigate to the page you built in step 3, right-click and select Publishing > Publish.
Select the site you wish to publish to and click Publish. This will send the page to the publishing queue.
Verify the page looks like you want it to, and edit/republish as needed.
Technical Specifications
Below are the types of page templates that allow Quiz components, along with the number of components for each type that can be inserted in the page.
Component Type - Component Template Accepted in Page Templates Min/Max Quiz - Quiz
- Flex Layout - Internal Page
0-1