Create the Wufoo component
The basics of a Wufoo component are outlined below. In order to complete this component, you will either need access to your agency's Wufoo account, or know which contact at your agency who can help get some of this information for you.
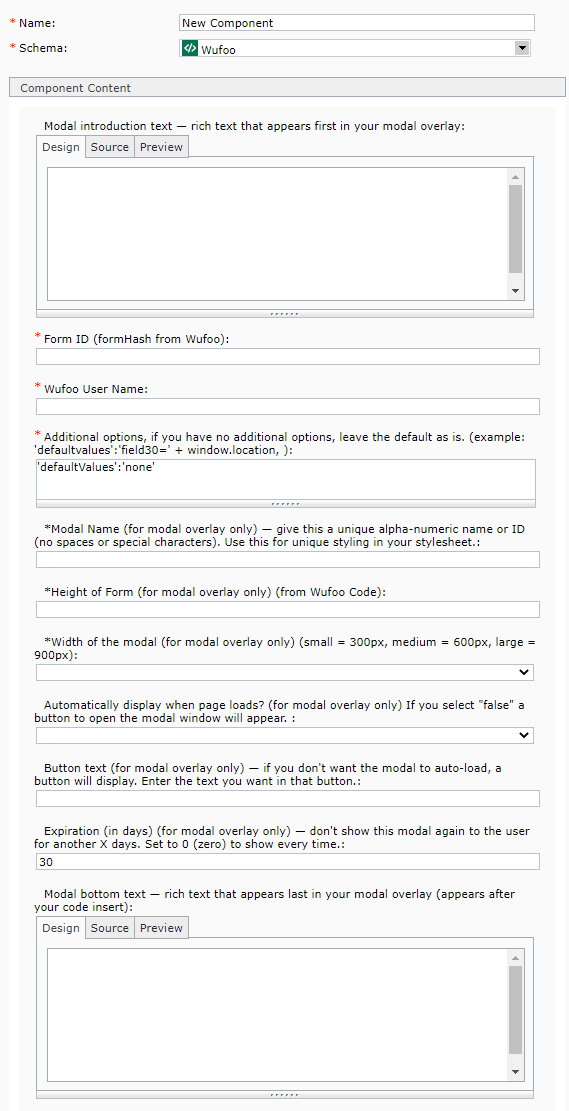
Tip: Wufoo forms can be embedded in the page, or displayed in a modal overlay (aka pop-up) window. If you plan to embed your form in the page, you only need to complete fields 1, 2, 4, 5, and 6. If you plan to embed your form in an overlay, then you will need to complete all the additional fields shown.
 Name: enter a name for your component here.
- Schema: select Wufoo
- Modal introduction text - rich text that appears first in your modal overlay: (optional) you only need to complete this field if you plan to have your form pop-up in an overlay window. If you wish to do that, enter the introductory text that will appear in the overlay window. This is a rich-text field that accepts images, bullets, font formatting, etc.
- FormID: enter the Form ID (or FormHash) from Wufoo.
- Wufoo User Name: enter the user name associated with this form in Wufoo.
- Additional options: leave this as the default unless you know what it is for and what you wish to change it to.
- Modal name: (for overlays only) enter a unique alpha-numeric name, without spaces or special characters, for your form here. Examples: 2012MNIT, 19Admin
- Height of form: (for overlays only) enter the height of your form in pixels.
- Width of the modal: (for overlays only) select either small, medium, or large sizing from the drop-down menu.
- Automatically display when page loads?: (for overlays only) if you select true, then the form pop-up window will appear when the page loads. If you select false, a button will appear on the page that triggers the pop-up window.
- Button text: (for overlays only) if you selected false in the previous field, then you can enter the text for your button here.
- Expiration: (for overlays only) if you want your overlay to appear to the same user every time they access the page, enter 0 in this field. Otherwise, you can set, in number of days, how often the user will see your overlays. For example, if you only want the user to see the overlay every 5 days, enter a 5 in this field.
- Modal bottom text: (optional) you only need to complete this field if you plan to have your form pop-up in an overlay window. In this field, enter the outro text that will appear in the overlay window after your form. This is a rich-text field that accepts images, bullets, font formatting, etc.
When you have filled out the fields as needed, save and close your component.


 Name: enter a