Create a Google Calendar
Below are instructions on how to integrate a Google Calendar into a webpage.
-
Create a Headline and Introduction for the Page
- In the 020 section, navigate to the folder where the components for the page with the Google Calendar integration will reside.
- Create a new component and complete the following fields:
- Name: enter a name for the component here
- Schema: select General Content
- Title: Enter a title for your page.
- Body Content: Add some introductory content for your page in this field.
Save and Close your component.
Create the Google Calendar component
To create this component, you will either need administrative access to the Google Calendar you wish to integrate, or be connected with someone who has this access and can provide you with the Google Calendar ID. Our team does not have access to state agency Google accounts, but if you connect us with the person in charge of the calendar you wish to integrate, we can help guide the account owner to where they can find this information for you.
- In the 020 section, navigate to the folder where the components for the page with the Facebook integration will reside.
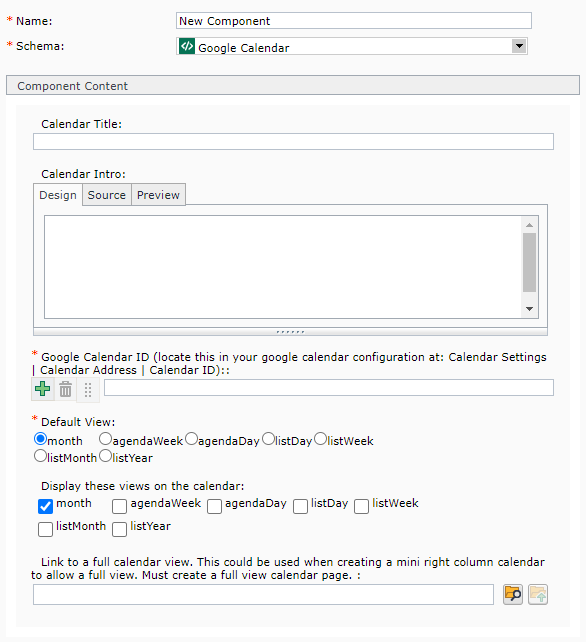
- Create a new component and complete the following fields:
- Name: enter a name for your component here.
- Schema: select Google Calendar
- Calendar Title: (optional) enter a title here. This will appear above your calendar as a subheading.
- Calendar Intro: (optional) enter a short description or other introductory material here. It will display above the calendar on the page.
- Google Calendar ID: paste your Google Calendar ID here. You can find this in the settings for your Calendar within Google. The Calendar ID will be formatted like XXXXXXXXXXXXXXX@group.calendar.google.com.
- While you are in Google: go to the Share this Calendar tab at the top of the page. Make sure there is a check in the box next to Make this calendar public. Click the Save button at the top of the page.
- Default View: select the default view for the calendar that should appear on the page when loaded:
- month: example of the default month view
- agendaWeek: example of the default agendaWeek view
- agendaDay: example of the default agendaDay view
- listDay: example of the default listDay view
- listWeek: example of the default listWeek view
- listMonth: example of the default listMonth view
- listYear: example of the default listYear view
- Display these views on the calendar: you can check all, some, or none of these options. The options that are checked will appear in the upper right corner of the calendar, and allow the user to toggle between different calendar views.
- month
- agendaWeek
- agendaDay
- listDay
- listWeek
- listMonth
- listYear
- Link to a full calendar view: (optional) if you have created a mini-calendar for a right-column or other small viewing area, you will need to link back to the full calendar component here. Navigate to where the full calendar component resides and select it.
- Name: enter a name for your component here.
- Save and Close the component.
(Optional) Create other components for the page
Google Calendar integrations can be used in a couple different page layouts, such as Flex Layout pages or pages with right columns. If you build anything other than a basic full calendar webpage, you'll need to create other content for the page, such as Flex Row Configurations, Flex Spotlights, Article Spotlights, etc. Go ahead and create those components at this time.
Create the Page
- In the 050 section, navigate to (or create) the structure group where the page will reside.
- Create a new page.
- Fill in the Name, File Name, Page Display Name, Dublin Core Title, and Dublin Core Description fields.
- For the Page Template field, select one of the following page templates:
- If you plan to create a full page calendar: you can use either the Internal General Content, Flex Layout - Internal Page, or Flex Layout - Main Landing Page
- If you plan to create a right column calendar: select Internal General Content with Right Column
- Click the Design tab.
- Click the Add button:
- Navigate to the General Content component you created in step 1, select it, apply the Page Introduction or General Content component templates, and insert it into the page.
- If creating a calendar in a right column: insert any other body components you created.
- Navigate to the Google Calendar component you created in step 2, select it, apply the appropriate component template for a full or right column calendar, and insert it into the page.
- Navigate to any other components you created (such as for Flex Layout pages), apply the appropriate component templates, and reorder them as necessary.
- Close the Insert Component Presentation pop-up window.
- Save and Close your page.
Publish the Page
When you've completed all the steps above, then all you need to do next is publish your page.
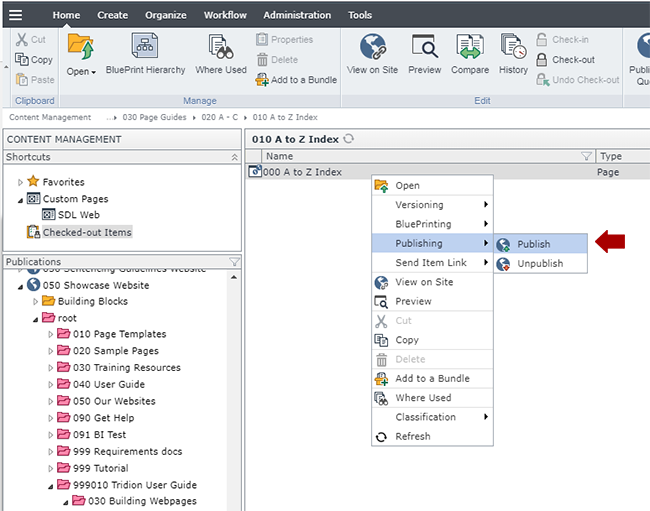
In the 050 section, navigate to the page you built in step 3, right-click and select Publishing > Publish.
Select the site you wish to publish to and click Publish. This will send the page to the publishing queue.
Verify the page looks like you want it to, and edit/republish as needed.
Technical Specifications
Below are the types of pages that the Google Calendar component can be used with.
Component Type / Template Accepted Page Templates Min/Max Google Calendar / Google Full Calendar
Google Calendar / Google Right Column Calendar
- Internal General Content
- Flex Layout - Internal Page
- Flex Layout - Main Landing Page
- Internal General Content with Right Column
0-1