This optional header box, called a Toggle Box, can be used for highlighting whatever content you would like. This is a rich-text field, so you can add links, images, bullets, etc.
Tip: Tridion has file size limits that most audio and all video files exceed. We recommend YouTube for videos, and static accounts for MP3s and other audio. Contact us to learn more about the static hosting accounts we offer.
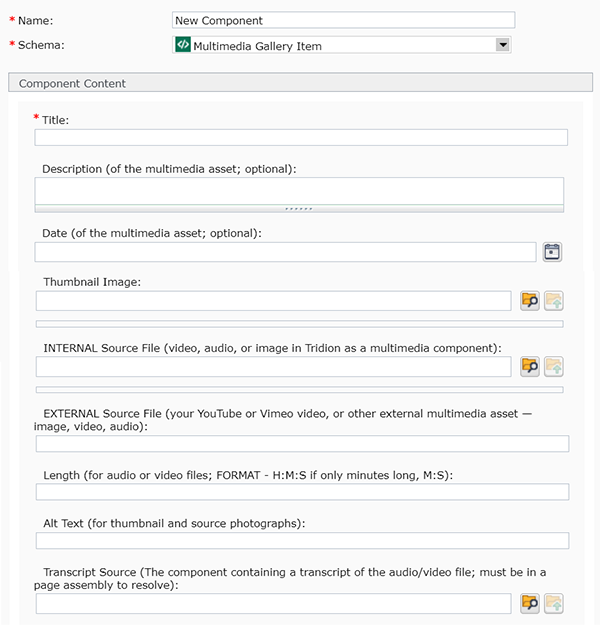
The first step to creating inline multimedia is to create the Multimedia Gallery Item component that produces it.
Description: (optional) enter a brief description for your multimedia item.
Date: (optional) enter a date in this field by clicking the little calendar icon to the right of the field. A pop-up will appear, which allows you to navigate through a calendar and select a date (forward and back dating articles is allowed). The Time field is in 24 hour time, so for a time like 2:00 pm, you will need to enter 14:00:00.
Thumbnail Image: (optional) to enter a photo for your multimedia item, click the browse folder icon , navigate to the image you want to use, and select it.
Internal Source File: (optional) to link to a file within your website, click the browse folder icon , navigate to the file you want to use, and select it.
External Source File: (optional) to link to a file located outside your website, enter the URL here.
Length: (optional, for audio and video files) enter the length of your file in H:M:S format.
Alt Text: (optional, for images) enter a description of your image here, for screen readers.
Transcript Source: (optional, for audio and video files) link to a transcript for your file by clicking the browse folder icon , navigating to the transcript component that is in a published page, and selecting it. (If you have not already created a transcript, here's where you can find information on creating a transcript.)
Inline multimedia is just one part of a page, so you will need to create additional components to fill in the other space on the page. Other components you could include (but aren't limited to) are: body text, rotators, images, calendars, etc.
For the Page Template field, select the page template for your page. Jumbotrons work on a variety of page templates, as shown in the table at the bottom of this page.
Click the Design tab.
Click the Add button:
Navigate to the Multimedia Gallery Item component you created in step 1, select it, apply one of these component templates, and insert it into the page:
Multimedia Item - inline no text - this displays the multimedia item across the full width of the page (or column, if using flex rows), with no additional information.
Multimedia Item - inline with text - this displays the multimedia item, along with any information entered in the component such as Title, Description, Length, Transcripts, etc. along the bottom of the item.
Navigate to any additional components you created in step 2, and insert them with the appropriate component templates in the appropriate order.
Close the Insert Component Presentation pop-up window.
When you've completed all the steps above, then all you need to do next is publish your page.
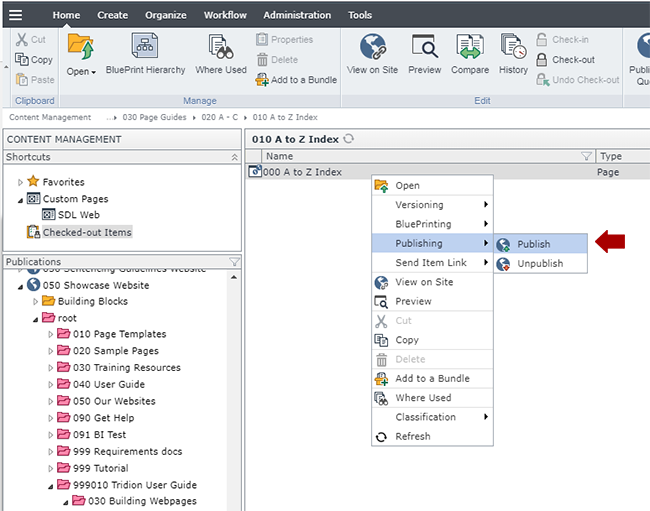
In the 050 section, navigate to the page you built in step 3, right-click and select Publishing > Publish.
Select the site you wish to publish to and click Publish. This will send the page to the publishing queue.
Verify the page looks like you want it to, and edit/republish as needed.
Technical Specifications
Below are the types of page templates that allow Multimedia Gallery Items used with the inline component templates, along with number of components for each type that can be inserted in the page.
Component Type - Component Template
Accepted in Page Templates
Min/Max
Multimedia Gallery Item /
Multimedia Item - inline no text
Multimedia Gallery Item /
Multimedia Item - inline with text